spring是什么
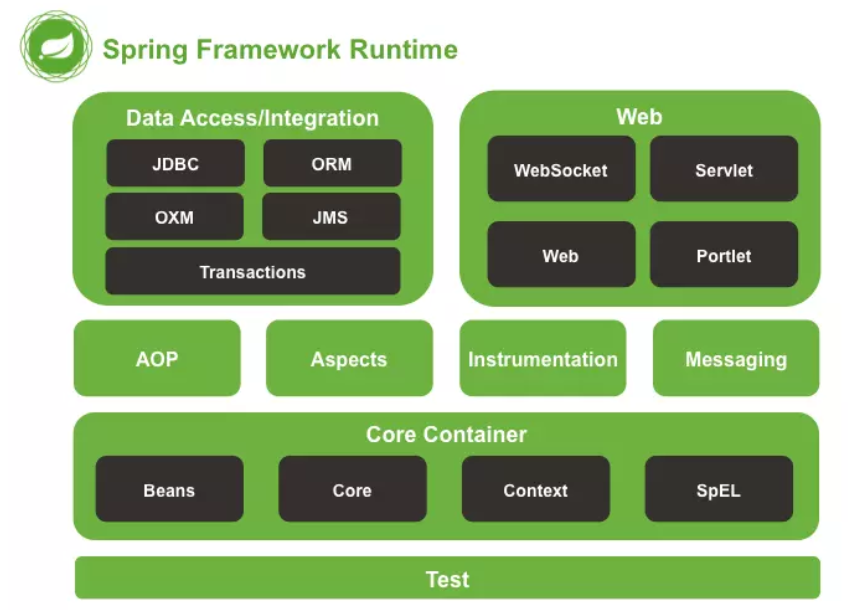
- Core Container这个模块是spring框架中最核心的部分,其他所有模块都是依赖它运行的。看到容器(装对象的),根据这样的一个结构设计来看,spirng是用来管对象的技术
- 是AOP(面向切面编程)模块设计型的概念。具体是做什么的呢?它可以在不惊动原始程序的基础上,给它增强功能,aspect也是对aop思想进行了实现
- Data Access 是和我们与数据库交互相关的内容
- web 和spring mvc相关
- test 用于快速测试,单例测试:就是对一个一个的方法进行测试的模式
核心概念
IOC控制反转/DI
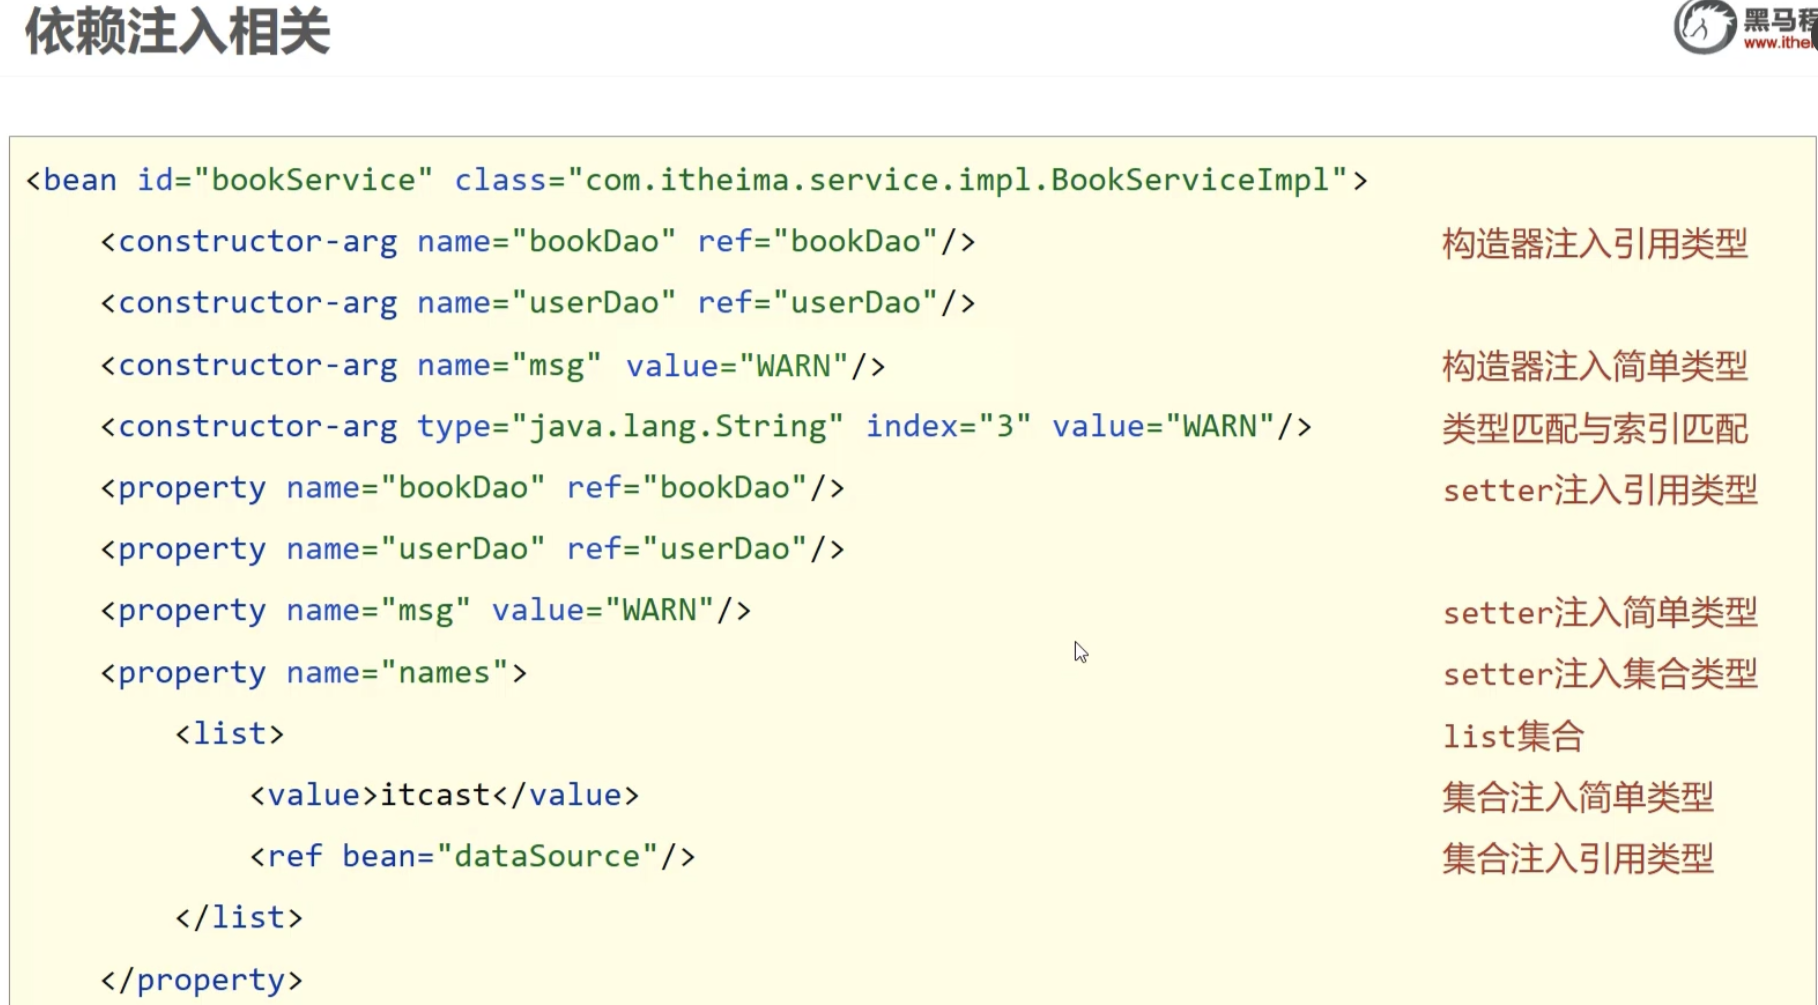
在controller中要使用Service 所以我们需要由既要创建controller,又要使得controller创建的时候要带上Service,将controller内部加上Service的过程就是DI(依赖注入)

配置文件注入方式
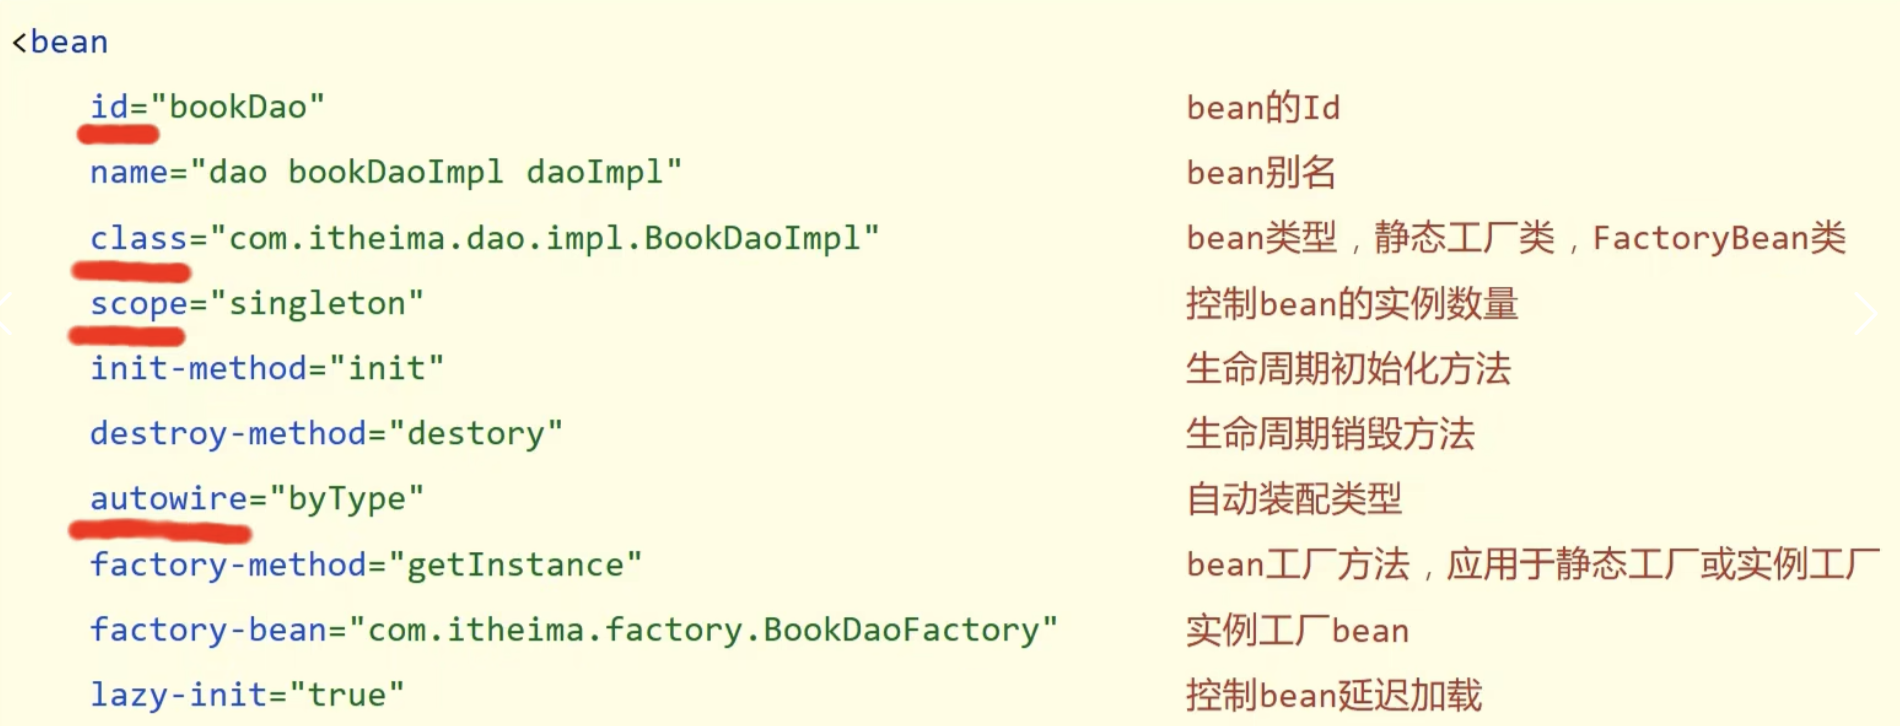
id是方便IOC容器查找的
class指明这个类在项目中的位置
<?xml version="1.0" encoding="UTF-8"?>
<beans xmlns="http://www.springframework.org/schema/beans"
       xmlns:xsi="http://www.w3.org/2001/XMLSchema-instance"
       xsi:schemaLocation="http://www.springframework.org/schema/beans http://www.springframework.org/schema/beans/spring-beans.xsd">
        <bean id="BlogService" class="com.traveller.service.Imp.BlogServiceImp"></bean>
</beans>
|
从容器中拿到对应的类
ApplicationContext context = new ClassPathXmlApplicationContext("applicationContext.xml");
BlogService bookService = (BlogService) context.getBean("blogService");
System.out.println(bookService);
|
Service和Dao之间的关系怎么描述,怎么注入?
首先在service中提供对应的set方法
public void setBlog(Blog blog) {
        this.blog=blog;
}
|
然后在配置中提供描述
<?xml version="1.0" encoding="UTF-8"?>
<beans xmlns="http://www.springframework.org/schema/beans"
       xmlns:xsi="http://www.w3.org/2001/XMLSchema-instance"
       xsi:schemaLocation="http://www.springframework.org/schema/beans http://www.springframework.org/schema/beans/spring-beans.xsd">
        //单例模式
        <bean id="blog" class="com.traveller.entity.Blog"></bean>
        //多实体类
        <bean id="blog" class="com.traveller.entity.Blog" scope="prototype"></bean>
        <bean id="blogService" class="com.traveller.service.Imp.BlogServiceImp">
            <property name="blog" ref="blog"></property>
        </bean>

</beans>
|
这样在启动项目后就能拿到带有blog属性的blogService了
在上面中我们提到单例模式:单例模式是设计模式的一种,用于控制示例生成的模式,当一个实例生成后,往后程序中所有对这个实例的引用都是同一个
设计这种模式的原因是为了提高性能,少创建实例,垃圾回收,缓存快速获取,因为要是多例,它会无穷无尽,用一次造一个,而spring在帮我们管理对象的时候,其实就是管理那些可以复用的对象。
Bean的实例化
- 构造方法
一、构造方法实例化
构造方法实例化是最常见的 Bean 实例化方式,Spring 容器会通过调用类的构造方法来创建 Bean 实例。以下是 Java 代码和 XML 配置示例:
java代码
public class UserService {
public UserService() {
System.out.println("UserService 实例被创建");
}
public void doSomething() {
System.out.println("UserService 执行操作");
}
}
public class Student {
private String name;
private int age;
public Student(String name, int age) {
this.name = name;
this.age = age;
System.out.println("Student 实例通过有参构造方法被创建");
}
public void showInfo() {
System.out.println("姓名: " + name + ", 年龄: " + age);
}
}
|
xml配置
<beans xmlns="http://www.springframework.org/schema/beans"
xmlns:xsi="http://www.w3.org/2001/XMLSchema-instance"
xsi:schemaLocation="http://www.springframework.org/schema/beans
http://www.springframework.org/schema/beans/spring-beans.xsd">
<bean id="userService" class="com.example.UserService"/>
</beans>
<beans xmlns="http://www.springframework.org/schema/beans"
xmlns:xsi="http://www.w3.org/2001/XMLSchema-instance"
xsi:schemaLocation="http://www.springframework.org/schema/beans
http://www.springframework.org/schema/beans/spring-beans.xsd">
<bean id="student" class="com.example.Student">
<constructor-arg index="0" value="张三"/>
<constructor-arg index="1" value="20"/>
</bean>
</beans>
|
- 静态工厂实例化
public class UserServiceFactory {
public static UserService createUserService() {
System.out.println("通过静态工厂方法创建 UserService 实例");
return new UserService();
}
}
public class UserService {
public UserService() {
System.out.println("UserService 实例被创建");
}
public void doSomething() {
System.out.println("UserService 执行操作");
}
}
|
xml配置
<beans xmlns="http://www.springframework.org/schema/beans"
xmlns:xsi="http://www.w3.org/2001/XMLSchema-instance"
xsi:schemaLocation="http://www.springframework.org/schema/beans
http://www.springframework.org/schema/beans/spring-beans.xsd">
<bean id="userService" class="com.example.UserServiceFactory" factory-method="createUserService"/>
</beans>
|
- 实例工厂
public class UserServiceInstanceFactory {
public UserService createUserService() {
System.out.println("通过实例工厂方法创建 UserService 实例");
return new UserService();
}
}
public class UserService {
public UserService() {
System.out.println("UserService 实例被创建");
}
public void doSomething() {
System.out.println("UserService 执行操作");
}
}
|
xml配置方式
<beans xmlns="http://www.springframework.org/schema/beans"
xmlns:xsi="http://www.w3.org/2001/XMLSchema-instance"
xsi:schemaLocation="http://www.springframework.org/schema/beans
http://www.springframework.org/schema/beans/spring-beans.xsd">
<bean id="userServiceFactory" class="com.example.UserServiceInstanceFactory"/>
<bean id="userService" factory-bean="userServiceFactory" factory-method="createUserService"/>
</beans>
|
静态工厂和实例工厂的区别就是静态工厂无需实例化,所以在xml中也无需配置
各种注入方式
<beans xmlns="http://www.springframework.org/schema/beans"
xmlns:xsi="http://www.w3.org/2001/XMLSchema-instance"
xsi:schemaLocation="http://www.springframework.org/schema/beans
http://www.springframework.org/schema/beans/spring-beans.xsd">
<bean id="anotherClass" class="AnotherClass">
<constructor-arg value="示例对象"/>
</bean>
<bean id="allTypeInjectionExample" class="AllTypeInjectionExample">
<property name="intValue" value="10"/>
<property name="doubleValue" value="3.14"/>
<property name="booleanValue" value="true"/>
<property name="stringValue" value="Hello, Spring!"/>
<property name="intArray">
<array>
<value>1</value>
<value>2</value>
<value>3</value>
</array>
</property>
<property name="stringArray">
<array>
<value>Apple</value>
<value>Banana</value>
<value>Orange</value>
</array>
</property>
<property name="listValue">
<list>
<value>Element1</value>
<value>Element2</value>
<value>Element3</value>
</list>
</property>
<property name="setValue">
<set>
<value>100</value>
<value>200</value>
<value>300</value>
</set>
</property>
<property name="mapValue">
<map>
<entry key="Key1" value="100"/>
<entry key="Key2" value="200"/>
<entry key="Key3" value="300"/>
</map>
</property>
<property name="anotherClass" ref="anotherClass"/>
</bean>
</beans>
|
bean的生命周期
在 Spring 框架中,Bean 的生命周期是指一个 Bean 从被 Spring 容器创建到最终被销毁的整个过程,
理解 Bean 的生命周期对于正确使用 Spring 框架以及进行一些高级特性开发(如自定义后置处理器等)非常重要
- 实例化
- 创建对象(内存分配)
- 执行构造方法
- 执行属性注入
- 执行bean的初始化方法
- 使用bean
- 关闭容器
一些与生命周期相关的方法
Aware Spring 会在依赖注入之后,调用相应的回调方法
BeanPostProcessor 前置处理,可以利用postProcessBeforeInitialization 方法对 Bean 进行一些预处理操作
InitializingBean Spring 会调用其 afterPropertiesSet 方法进行初始化操作。或者在xml中指定初始方法
public class UserService {
    public void initMethod() {
        System.out.println("UserService 调用自定义初始化方法 initMethod");
    }
}
|
<bean id="userService" class="com.example.UserService" init-method="initMethod"/>
|
BeanPostProcessor 的 postProcessAfterInitialization可以利用这个方法对 Bean 进行一些后处理操作
销毁容器如果 Bean 实现了 DisposableBean,Spring会调用其destroy方法
同样也可以使用xml配置
public class UserService {
    public void destroyMethod() {
        System.out.println("UserService 调用自定义销毁方法 destroyMethod");
    }
}
|
<bean id="userService" class="com.example.UserService" destroy-method="destroyMethod"/>
|
在实际过程中,我们的程序时运行在java虚拟机上的,但是虚拟机会在bean销毁前退出,也就是会导致destroyMethod方法失效 解决方法有ctx.close(),但是这个属于暴力关闭,不够安全和优雅。 2.注册关闭钩子registerShutdownHook。但是因为我们做的是web应用,容器会交给tomcat关闭。所以一般不用写。
使用properties来进行软编码
properties配置文件
jdbc.url=jdbc:mysql://localhost:3306/testdb
jdbc.username=root
jdbc.password=123456
jdbc.driverClassName=com.mysql.cj.jdbc.Driver
|
xml文件中先加载引入配置文件
<beans xmlns="http://www.springframework.org/schema/beans"
xmlns:xsi="http://www.w3.org/2001/XMLSchema-instance"
xmlns:context="http://www.springframework.org/schema/context"
xsi:schemaLocation="http://www.springframework.org/schema/beans
http://www.springframework.org/schema/beans/spring-beans.xsd
http://www.springframework.org/schema/context
http://www.springframework.org/schema/context/spring-context.xsd">
<context:property-placeholder location="classpath:application.properties"/>
<bean id="dataSource" class="org.apache.commons.dbcp2.BasicDataSource">
<property name="url" value="${jdbc.url}"/>
<property name="username" value="${jdbc.username}"/>
<property name="password" value="${jdbc.password}"/>
<property name="driverClassName" value="${jdbc.driverClassName}"/>
</bean>
<bean id="appConfig" class="com.example.AppConfig">
<property name="appName" value="${app.name}"/>
</bean>
</beans>
|
容器
容器相关属性
注解开发
定义bean
@Component这是一个通用的注解,用于将一个类标记为 Spring 容器管理的 Bean。它是 @Repository、@Service 和 @Controller 的父注解。
import org.springframework.stereotype.Component;

@Component
public class MyComponent {
    public void doSomething() {
        System.out.println("MyComponent is doing something.");
    }
}
|
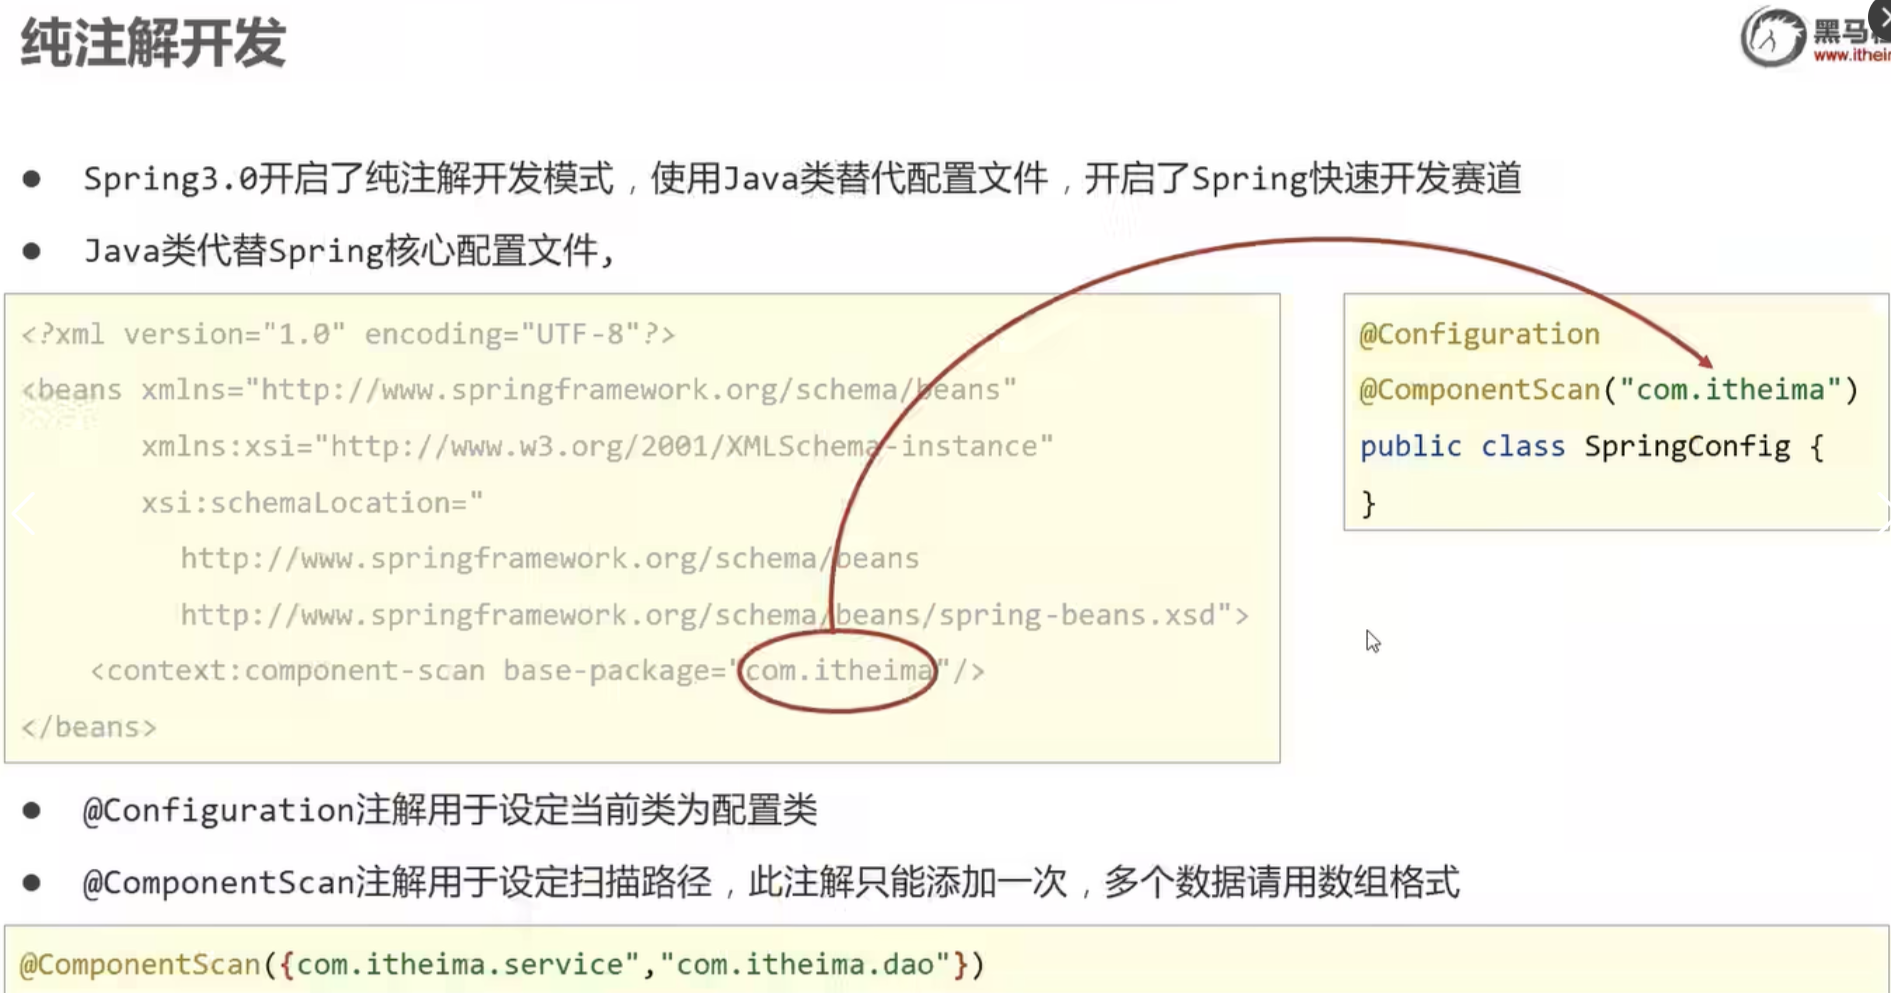
注解注入方式
使用@Scope定义bean的作用范围,PostConstruct和PreDestroy定义周期
@Repository
@Scope("singleton")
public Class BooDaoImpl implements BookDao{
    @PostConstruct
    public void init(){
        System.out.println("book init....");
    }
    @PreDestroy
    public void destroy(){
       System.out.println("book destroy....");
    }
}
|
- @Autowired
- 作用:
@Autowired 是 Spring 中最常用的依赖注入注解,它可以对构造函数、字段、Setter 方法和配置方法进行标注,以实现自动装配。默认情况下,@Autowired 按照类型进行自动装配,如果有多个匹配的 Bean,会尝试根据名称进行匹配。
- 示例代码
import org.springframework.beans.factory.annotation.Autowired;
import org.springframework.stereotype.Service;
@Service
public class UserService {
@Autowired
private UserDao userDao;
public void createUser() {
userDao.saveUser();
}
}
@Service
public class PaymentService {
@Autowired
@Qualifier("alipayPayment")
private Payment payment;
public void doPayment() {
payment.pay();
}
}
|
- @Resource
作用:@Resource 是 JSR - 250 规范的注解,它可以根据名称或类型进行注入。默认情况下,先根据名称进行匹配,如果找不到匹配的 Bean,再根据类型进行匹配。
@Service
public class ProductService {
    @Resource(name = "productDao")
    private ProductDao productDao;

    public void addProduct() {
        productDao.saveProduct();
    }
}
|
3.@Value 用于简单的值的注入或者是外部配置文件 :后面是默认值
import org.springframework.beans.factory.annotation.Value;
import org.springframework.stereotype.Component;

@Component
public class AppConfig {
    @Value("${app.name}")
    private String appName;

    @Value("${app.version:1.0}")
    private String appVersion;

    public String getAppName() {
        return appName;
    }

    public String getAppVersion() {
        return appVersion;
    }
}

public class ProductService {
    @Resource(name = "productDao")
    private ProductDao productDao;
    @Value("小明")
    private String name;
    public void addProduct() {
        productDao.saveProduct();
    }
}
|
AOP
我们说过spring有两大特征,一个是ioc,一个是aop。
AOP用于在代码不变的基础下增强功能
在 AOP 中有以下几个概念:
- AspectJ:切面,只是一个概念,没有具体的接口或类与之对应,是 Join point,Advice 和 Pointcut 的一个统称。
- Join point:连接点,指程序执行过程中的一个点,例如方法调用、异常处理等。在 Spring AOP 中,仅支持方法级别的连接点。
- Advice:通知,即我们定义的一个切面中的横切逻辑,有“around”,“before”和“after”三种类型。在很多的 AOP 实现框架中,Advice 通常作为一个拦截器,也可以包含许多个拦截器作为一条链路围绕着 Join point 进行处理。
- Pointcut:切点,用于匹配连接点,一个 AspectJ 中包含哪些 Join point需要由 Pointcut 进行筛选。
- Introduction:引介,让一个切面可以声明被通知的对象实现任何他们没有真正实现的额外的接口。例如可以让一个代理对象代理两个目标类。
- Weaving:织入,在有了连接点、切点、通知以及切面,如何将它们应用到程序中呢?没错,就是织入,在切点的引导下,将通知逻辑插入到目标方法上,使得我们的通知逻辑在方法调用时得以执行。
- AOP proxy:AOP 代理,指在 AOP 实现框架中实现切面协议的对象。在 Spring AOP 中有两种代理,分别是 JDK 动态代理和 CGLIB 动态代理。
- Target object:目标对象,就是被代理的对象。
Spring AOP 是基于 JDK 动态代理和 Cglib 提升实现的,两种代理方式都属于运行时的一个方式所以它没有编译时的一个处理,那么因此 Spring 是通过 Java 代码实现的。
各类写法
注意要在主类上开起@EnableAspectJAutoProxy
import org.aspectj.lang.JoinPoint;
import org.aspectj.lang.ProceedingJoinPoint;
import org.aspectj.lang.annotation.*;
import org.springframework.stereotype.Component;
@Aspect
@Component
public class UserServiceAspect {
@Pointcut("execution(* com.example.service.UserService.*(..))")
public void userServiceMethods() {}
@Before("userServiceMethods()")
public void beforeAdvice(JoinPoint joinPoint) {
System.out.println("Before method: " + joinPoint.getSignature().getName());
}
@After("userServiceMethods()")
public void afterAdvice(JoinPoint joinPoint) {
System.out.println("After method: " + joinPoint.getSignature().getName());
}
@AfterReturning(pointcut = "userServiceMethods()", returning = "result")
public void afterReturningAdvice(JoinPoint joinPoint, Object result) {
System.out.println("Method " + joinPoint.getSignature().getName() + " returned: " + result);
}
@AfterThrowing(pointcut = "userServiceMethods()", throwing = "ex")
public void afterThrowingAdvice(JoinPoint joinPoint, RuntimeException ex) {
System.out.println("Method " + joinPoint.getSignature().getName() + " threw exception: " + ex.getMessage());
}
@Around("userServiceMethods()")
public Object aroundAdvice(ProceedingJoinPoint pjp) throws Throwable {
System.out.println("Around advice: Before method execution");
Object result = pjp.proceed();
System.out.println("Around advice: After method execution");
return result;
}
}
|


